by Stan Czerno
January 21, 2022 14:54 CST
From what I can tell with Personal Session Hosts, once the Session Host is assigned to a user, you are stuck with that config. Microsoft seems to be saying, you can't, or shouldn't, reassign the Session Host to a different user. Just remove the Session Host from the Host Pool, delete the VM and create a new VM. This probably makes sense if the VM was used for a long period of time, and you want to make sure there are no issues. After all, these are not MCS or PVS created machines and can accumulate crap over time.
I am still new to Azure Virtual Desktop, but this seems like there is some other undocumented reason for this. I'll admit that reading Vendor documentation has always been vague, and most times they assume you know about some other factor that is not mentioned. So, in this case, I assuming it is best practice to start over with a new VM, sounds legit. After all, it's what I do for on-premises for Persistent XenDesktop VMs.

Well, fine, but dammit Jim, I'm stubborn, and sometimes I want to skirt around things. I mean I doubt I will ever use this for a Production Environment, unless the Citrix Cloud offering isn't much better, which is next on my list to test. Besides, I am really playing with an Azure AD Joined Pooled Multi-Host VM, not a One-to-One assignment. I just wanted to change the Host Pool the Session Host was currently in.
Here are the steps I took to move a Pooled Session Host, to a new Host Pool. I see no reason why this would not work if you just wanted to reassign a user to a Personal Session Host, without recreating the VM.
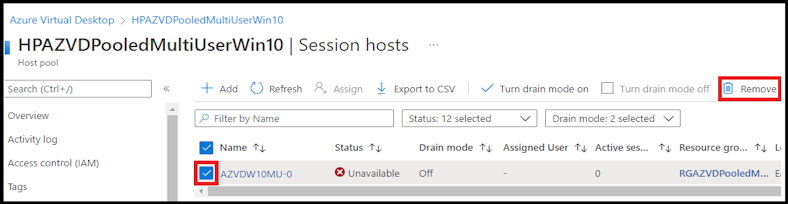
- First, I removed the Session Host from the Host Pool.
- Navigate to https://portal.azure.com -> "Azure Virtual Desktop" -> "Host pools" -> "<Host Pool Name>" -> "Session Hosts"
- Select the Session Host, then click Remove.
- I gave the Session Host VM a Public IP address (dynamic).
- I allowed RDP, temporarily, from only my local Internet Subnet.
- I connected to the Public IP using MSTSC.exe.
- I basically followed the steps outlined in this article.
- Uninstall all Agent, Boot Loader, and Stack component programs.
- Uninstall all instances of the following programs:
- Remote Desktop Agent Boot Loader
- Remote Desktop Services Infrastructure Agent
- Remote Desktop Services Infrastructure Geneva Agent
- Remote Desktop Services SxS Network Stack
- I then followed the steps outlined in this article.
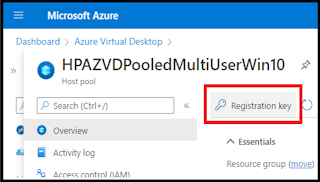
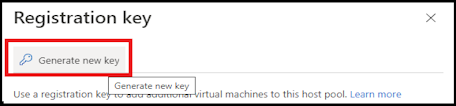
- First, create a new Registration Key.
- Navigate to https://portal.azure.com -> "Azure Virtual Desktop" -> Host pools -> <Host Pool Name to Add/Reassign the Session Host to> -> "Registration key" -> "Generate new key".
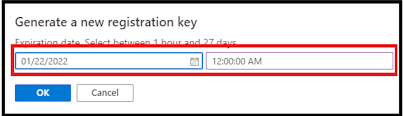
- Set expiration date and time, how long it is valid is up to you.
- Copy the Registration Key once generated, you will need this for the Azure Virtual Desktop Agent installation.
- Download and install the Azure Virtual Desktop Agent https://query.prod.cms.rt.microsoft.com/cms/api/am/binary/RWrmXv
- Don't use the packages in the existing DeployAgent folder on the VM, they are most likely old.
- Select "INVALID_TOKEN" and paste the Registration Key.
- Download and install the Azure Virtual Desktop Agent Bootloader. https://query.prod.cms.rt.microsoft.com/cms/api/am/binary/RWrxrH
- Shutdown the VM, remove the RDP allow rule, remove the Public IP, then start the VM.
- Once the VM starts and registers, the Session Host should now be available in the Host Pool.
- Reassign Users as required.
